在实际项目中,我们经常会用到本地缓存,但是往往缺少对缓存使用情况的观测。今天推荐一种用法,让你更优雅地使用本地缓存。
项目地址:https://github.com/studeyang/toolkit
一、管理本地缓存
缓存管理首页如下:
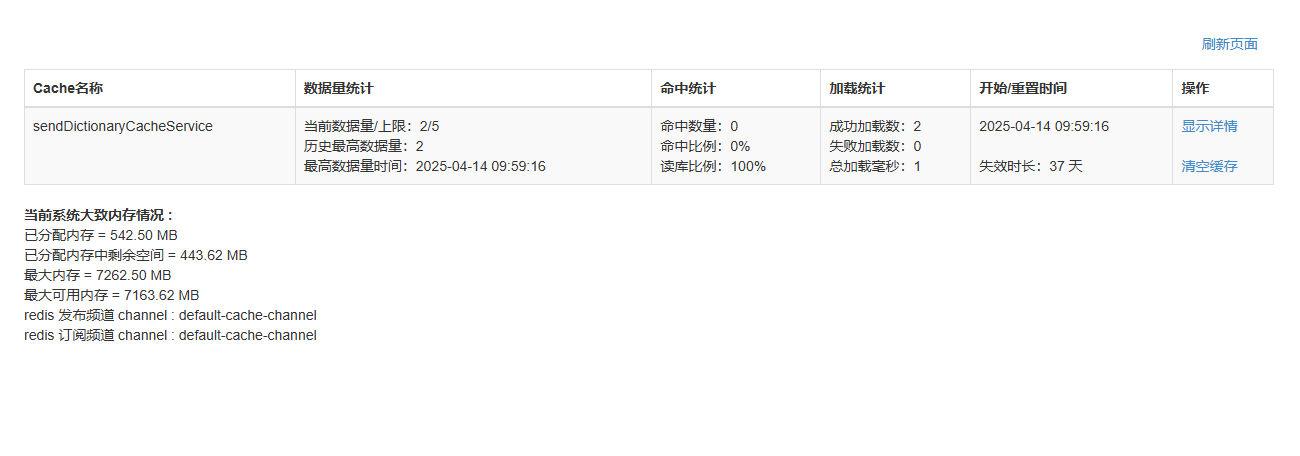
- 点击【显示详情】:可查看缓存下的所有 key,value
- 点击【清空缓存】:清空本地缓存,再次访问会重新加载新的缓存数据
接下来介绍一下如何让项目接入上图的缓存管理页。
1.1 接入本地缓存组件
1、添加依赖
1
2
3
4
5
6
7
8
| <dependency>
<groupId>io.github.studeyang</groupId>
<artifactId>toolkit-spring-boot-starter</artifactId>
</dependency>
<dependency>
<groupId>io.github.studeyang</groupId>
<artifactId>toolkit-cache</artifactId>
</dependency>
|
2、开启功能
在启动类上添加 @EnableCache 注解。
1
2
3
4
5
6
7
| @SpringBootApplication
@EnableCache
public class WebApplication {
public static void main(String[] args) {
SpringApplication.run(WebApplication.class, args);
}
}
|
3、应用配置
配置 Redis 以便刷新缓存(下文详细说明)。
1
2
3
4
5
6
7
8
9
10
11
12
13
14
|
spring:
redis:
client-name: example
cluster.nodes: ${redis.nodes}
password: ${redis.password}
cluster.max-redirects: 3
jedis.pool.maxIdle: 50
jedis.pool.maxActive: 50
jedis.pool.minIdle: 10
jedis.pool.maxWait: 3000
timeout: 3000
|
至此,启动程序后就可以访问缓存管理首页了,但是看不到任何缓存数据。接下来我们就来实现具体的缓存。
1.2 实现缓存类
缓存实现类需要继承AbstractLoadingCache,具体代码实现如下:
1
2
3
4
5
6
7
8
9
10
11
12
13
14
15
16
17
18
19
20
21
22
23
24
25
26
27
28
| @Service
public class UserCacheImpl extends AbstractLoadingCache<String, UserEntity> {
public UserCacheImpl() {
setMaximumSize(5);
setTimeUnit(TimeUnit.DAYS);
setExpireAfterWriteDuration(37);
}
@Override
public UserEntity get(String key) {
try {
return super.getValue(key);
} catch (Exception e) {
return null;
}
}
@Override
public UserEntity loadData(String key) {
UserEntity user = new UserEntity();
user.setId(key);
user.setUserName("人员" + key);
return user;
}
}
|
上述代码的要点主要有:
- 构造器方法配置了缓存的最大条数,以及缓存的过期时间;
get() 方法实现了获取缓存逻辑;loadData() 方法实现了加载缓存数据的逻辑,通常是从数据库读数据;
由于缓存采用的是懒加载策略,我们在程序启动时加载一下缓存:
1
2
3
4
5
6
7
8
9
10
11
12
| @Component
public class CacheLoader implements ApplicationRunner {
@Autowired
private UserCacheImpl userCacheImpl;
@Override
public void run(ApplicationArguments args) {
System.out.println("userCacheImpl: " + userCacheImpl.get("01"));
System.out.println("userCacheImpl: " + userCacheImpl.get("02"));
}
}
|
程序启动后,访问:http://localhost:8080/cache/getAllCacheStats
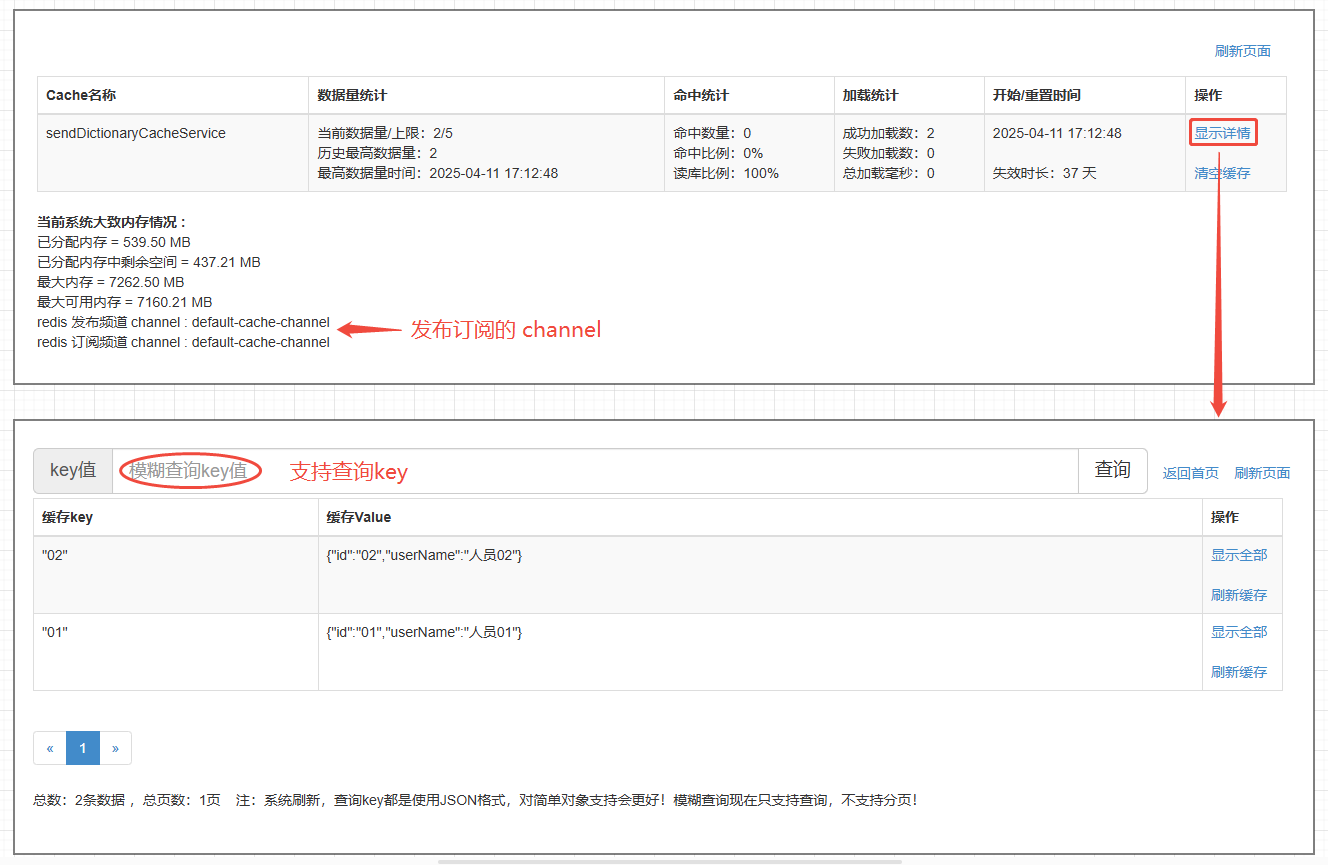
上图内容要点主要有:
- 在缓存首页可以看到 Redis 的发布订单的 channel(下文会详细说明);
- 点击【清空缓存】,可以针对该缓存进行全量刷新;
- 点击【显示详情】,可以看到缓存的详情页,支持查询key;
- 点击单个缓存 key【刷新缓存】,可以重新加载新的缓存数据。
下面我们就来看看刷新的具体实现。
二、刷新缓存
2.1 单节点刷新
本文是基于 Guava 实现缓存管理的,Guava 提供了缓存失效的接口 com.google.common.cache.Cache,接口如下:
1
2
3
4
| public interface Cache<K, V> {
void invalidateAll();
}
|
我们也可以刷新缓存,Guava 提供了刷新缓存的接口 com.google.common.cache.LoadingCache#refresh,接口如下:
1
2
3
4
| public interface LoadingCache<K, V> extends Cache<K, V>, Function<K, V> {
void refresh(K key);
}
|
以上接口只能刷新单个节点的缓存,对于分布式应用,我们该如何处理呢?
2.2 分布式刷新
Redis 提供了发布订单的功能,图示如下:
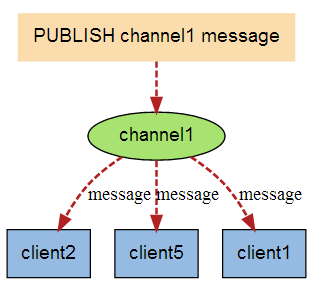
这里我们做一个简单的演示。首先,client 1 订阅 channel1 渠道的消息。
1
2
3
4
5
6
| #
redis 127.0.0.1:6379> SUBSCRIBE channel1
Reading messages... (press Ctrl-C to quit)
1) "subscribe"
2) "channel1"
3) (integer) 1
|
再重新开启一个 redis 客户端,然后在同一个频道 channel1 发布消息,订阅者就能接收到消息。
1
2
3
4
5
6
7
8
| redis 127.0.0.1:6379> PUBLISH channel1 "Refresh Cache"
(integer) 1
# 订阅者的客户端会显示如下消息
1) "message"
2) "channel1"
3) "Refresh Cache"
|
本文正是基于这个特性,实现分布式缓存刷新。
Redis 发布订阅更多细节可参考:https://www.runoob.com/redis/redis-pub-sub.html
发布者通过 redisTemplate.convertAndSend(channel, FastJSONHelper.serialize(dto)) 这行代码将缓存刷新的内容发出。发布者实现如下:
1
2
3
4
5
6
7
8
9
10
11
12
13
14
15
16
17
18
19
20
21
| import io.github.toolkit.cache.dto.GuavaCacheSubscribeDto;
import io.github.toolkit.cache.pubsub.IGuavaCachePublisher;
import org.springframework.data.redis.core.RedisTemplate;
public class RedisClusterCachePublisher implements IGuavaCachePublisher {
private final RedisTemplate<Object, Object> redisTemplate;
private final String channel;
public RedisClusterCachePublisher(RedisTemplate<Object, Object> redisTemplate, String channel) {
this.redisTemplate = redisTemplate;
this.channel = channel;
}
@Override
public void publish(String cacheName, Object cacheKey) {
GuavaCacheSubscribeDto dto = new GuavaCacheSubscribeDto();
dto.setCacheName(cacheName);
dto.setCacheKey(JSON.toJSONString(cacheKey));
redisTemplate.convertAndSend(channel, FastJSONHelper.serialize(dto));
}
}
|
订阅者通过 listenerContainer.addMessageListener(messageListener, topic) 这行代码监听缓存刷新的内容。实现如下:
1
2
3
4
5
6
7
8
9
10
11
12
13
14
15
16
17
18
19
20
21
22
23
24
25
26
27
28
29
30
31
32
33
34
35
36
37
38
39
| import io.github.toolkit.cache.dto.GuavaCacheSubscribeDto;
import io.github.toolkit.cache.guava.GuavaCacheManager;
import io.github.toolkit.cache.pubsub.ISubscribeListener;
import org.springframework.beans.factory.InitializingBean;
import org.springframework.data.redis.connection.MessageListener;
import org.springframework.data.redis.core.RedisTemplate;
import org.springframework.data.redis.listener.ChannelTopic;
import org.springframework.data.redis.listener.RedisMessageListenerContainer;
public class RedisClusterCacheListener implements ISubscribeListener<GuavaCacheSubscribeDto>, InitializingBean {
private RedisMessageListenerContainer listenerContainer;
private final RedisTemplate<Object, Object> redisTemplate;
private final String channel;
public RedisClusterCacheListener(RedisTemplate<Object, Object> redisTemplate, String channel) {
this.redisTemplate = redisTemplate;
this.channel = channel;
}
@Override
public void afterPropertiesSet() {
ChannelTopic topic = new ChannelTopic(channel);
MessageListener messageListener = (message, pattern) -> {
String body = (String) redisTemplate.getDefaultSerializer().deserialize(message.getBody());
GuavaCacheSubscribeDto dto = FastJSONHelper.deserialize(body, GuavaCacheSubscribeDto.class);
this.onMessage(dto);
};
listenerContainer = new RedisMessageListenerContainer();
listenerContainer.setConnectionFactory(redisTemplate.getConnectionFactory());
listenerContainer.addMessageListener(messageListener, topic);
listenerContainer.afterPropertiesSet();
}
@Override
public void onMessage(GuavaCacheSubscribeDto message) {
GuavaCacheManager.resetCache(message.getCacheName());
}
}
|
在 afterPropertiesSet() 方法中可以看到,messageListener 最终会走到 onMessage 方法重置缓存,重置缓存实现如下:
1
2
3
4
5
6
7
8
9
10
11
12
13
14
15
16
17
18
19
20
21
22
23
24
25
| import io.github.toolkit.cache.util.SpringContextUtil;
import java.util.Date;
import java.util.Map;
public class GuavaCacheManager {
private static Map<String, AbstractLoadingCache> cacheNameToObjectMap = null;
private static Map<String, AbstractLoadingCache> getCacheMap() {
if (cacheNameToObjectMap == null) {
cacheNameToObjectMap = SpringContextUtil.getBeanOfType(AbstractLoadingCache.class);
}
return cacheNameToObjectMap;
}
private static AbstractLoadingCache<Object, Object> getCacheByName(String cacheName) {
return getCacheMap().get(cacheName);
}
public static void resetCache(String cacheName) {
AbstractLoadingCache<Object, Object> cacheMap = getCacheByName(cacheName);
cacheMap.getCache().invalidateAll();
cacheMap.setResetTime(new Date());
}
}
|
最终是调用了 Guava 的 invalidateAll() 方法。
到这里,Redis 的发布订阅就实现完成了,我们还需要将发布者的访问接口暴露出来,以便主动发起刷新。这里我们单独提供一个接口出来:
1
2
3
4
5
6
7
8
9
10
11
| @RestController
public class ExampleController {
@Autowired
private IGuavaCachePublisher guavaCachePublisher;
@GetMapping("/example/cache")
public String refreshCache(@RequestParam String cacheName, @RequestParam String cacheKey) {
guavaCachePublisher.publish(cacheName, cacheKey);
return "success";
}
}
|
接口调用接口:
1
2
3
4
| curl --location --request GET 'http://localhost:8080/example/cache?cacheName=sendDictionaryCacheService&cacheKey=01' \
--header 'Accept: */*' \
--header 'Host: localhost:8080' \
--header 'Connection: keep-alive'
|
这样就完成了缓存的刷新。

封面

更多文章

